Sunday, April 25, 2010

The Final Violin

On April 24, 2010 I finished this violin.  I hope to finish another one by the end of this year between other repairs.

Friday, February 12, 2010

William & Mary Style Drop Leaf Table Restoration


I recently finished restoring this drop leaf table. My wife and I bought it at an antique store. It was missing one of the gate leg assemblies (two horizontal spindles and the gate leg.  I turned new spindles and refinished the entire table.  I am now in the process of selling it.  It was a fun little project.
Posted by Picasa

Tuesday, December 29, 2009

Violin "In The White"


I have been working on this violin off and on for about 2 1/2 years. Since September of this year I have finished carving out the insides of the top and bottom plates attached them to the ribs, carved the scroll and neck, and installed the neck onto the violin body. I am now at the point of varnishing the violin.

Wednesday, September 30, 2009

Violin Update: Purfling


In the month of September, I began working on my violin again. I had put it off for well over a year because I began getting a lot of custom woodcraft and repair projects to do. I have backed off seeking new projects in order to work on the violin. Since the last post years ago, I have finished carving the violin plates, have carved the f-holes and have cut the channels for the purfling. This is a picture of the setup I used to cut the channels using a Dremel tool and 1.3 mm channel cutting bit. It was extremely scary to do. I thought it best to immobilize the tool and move the plates with both hands. I was successful in cutting the channels in both plates with no mistakes!

Tuesday, August 04, 2009

Garden Potting Table


This is a Garden Potting Table built to client's specifications. I came up with this design idea. Removing four deck screws in the lower shelf allows you to adjust it up or down. It took four hours to cut and assemble this table. The goal of this project was to keep building materials and construction costs down. All joints are glued and air nailed butt joints, reinforced with deck screws. I used 3/8" dowels to join the table top to the table apron. The design ensures that legs will not weaken individually. Stress put on any leg is distributed over the lower shelf because they are all directly connected. The table will eventually be painted by the client.

Monday, April 27, 2009

Victorian Chair Repair


I was asked to repair this beautiful Victorian cushioned chair. Below is a short video showing how the repair was made:


Wednesday, February 04, 2009

Ornate Leather Highback Chair Restoration


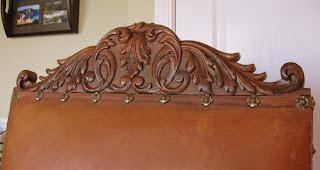
January 2009 - This beautiful chair was in the process of being delivered to it's new owner when it fell off the back of a pick-up truck. It landed directly on the sculptured appointment on the chair back and broke into several pieces, some of which were never found. both arms were also broken off. The chair back sculpture was painstakingly pieced back together and missing parts were recreated. The chair arms and legs were reattached and/or reinforced. This was a challenging and very enjoyable restoration.

Wednesday, November 05, 2008


My daughter in college found a new apartment but did not have a bedside table to put next to her desk. I agreed to build her one out of shop scraps. This was the result. It is made from 3/4 Luan plywood for the top (edged with 1/8 inch poplar strips), drawer and door fronts; half-inch plywood for the drawer sides and back, a piece of 1/4 oak plywood for the drawer bottom; poplar side and back frames over which was placed 1/4 inch beadboard; 1/4 inch pine plywood for the back; and pine 2x4s for the legs. All joinery was kreg pocket hole screws and glue - sometimes glue only. I used pin nails and glue to attach the side panels and attached the top with metal plate fasteners and screws. I could have simply glued the top on but chose the plates and screws. I stained the cabinet with some oil-based stain I had left over from other projects and covered the cabinet with two coats of minwax wipe-on poly. The top was finished with two coats of Zinsser seal-coat (dewaxed) and three coats of minwax wip-on poly for extra durability and smoothness.

Friday, October 10, 2008

Elizabeth's Display Case Remodel/Restoration

October 10, 2008
Just finished this project. Elizabeth requested a remodel of this display case. Originally, It had a window in the front that did not open. Entry into the case was only from the right side. She purchased this case for $100 because the mirrors, glass shelves and front window had broken and were removed. She requested that I add a door, restore a chipped off place on one of the sculptured appointments and install all missing glass and mirrors. Originally, the front window stretched from the top wavy curve to the bottom of the cabinet. In order to add a door, I needed to lower the top of the case to below the leaf appointments on each side so the door could open properly. I mirrored the wavy design and added that piece of wood to lower the top section. I think it added interest and functionality to the case. It was a challenge and a lot of fun!

Thursday, May 08, 2008

Redwood Picnic Table Restoration


This redwood picnic table was in very bad shape. It had significant weather damage including significant wood rot along with a severe ongoing carpenter ant infestation. In the center photo you can see that almost the entire board on the left had been consumed by the carpenter ants. This project required significant use of insect killer, wood filler, epoxy and wood stabilizer followed by resurfacing, staining and varnishing of all boards prior to assembly, to restore this table.

Tuesday, February 26, 2008

Jamie's Bookcase


Between February 12 and 24th, 2008 I built this bookcase for Jamie. She requested it for her baby's bedroom.

The bookcase is made from tulip poplar wood and a 1/4" plywood back. Joinery included dados for the center shelf, rabbets for the corner joints and pocket screws for the top and bottom support frames. The feet were hand-turned on my lathe.

The finish included bullseye primer and two coats of exterior latex paint. I put a coat of polyurethane over the top and lower shelves for a little extra protection against moisture.

It was a fun little project.

Thursday, January 03, 2008

Christmas Projects 2007


This Christmas I gave these projects as Christmas presents. My soon to be 89-year-old mother had mentioned to my brother-in-law that she could use a cane to steady herself at times. He suggested that I make her one. This one was constructed from walnut & quartersawn red oak left from a previous project. The handle is called a Derby style. I learned a lot about canes in the process. Mom was surprised and delighted, which brought me great joy.


I drew my niece for Christmas this year in our family gift exchange and made this step stool for her. We put our names in a hat and got a present for the person we drew. It was a lot of fun! Before, everyone got everyone a present and it was getting out of hand. This works much better for us.


Friday, December 07, 2007

Cherry Occasional Table

This table was commissioned by a friend for her livingroom. I constructed a stick model for the space in her livingroom where she wanted to locate the piece. I wanted to make sure it would fit the space properly. She requested the finials on the tabletop. It was a lot of fun to build.

Cherry Side Table


I built this table as a wedding present for my nephew and his wife. It was made from a single board and was finished with danish oil. The pull is an old original dating back to about 1918.